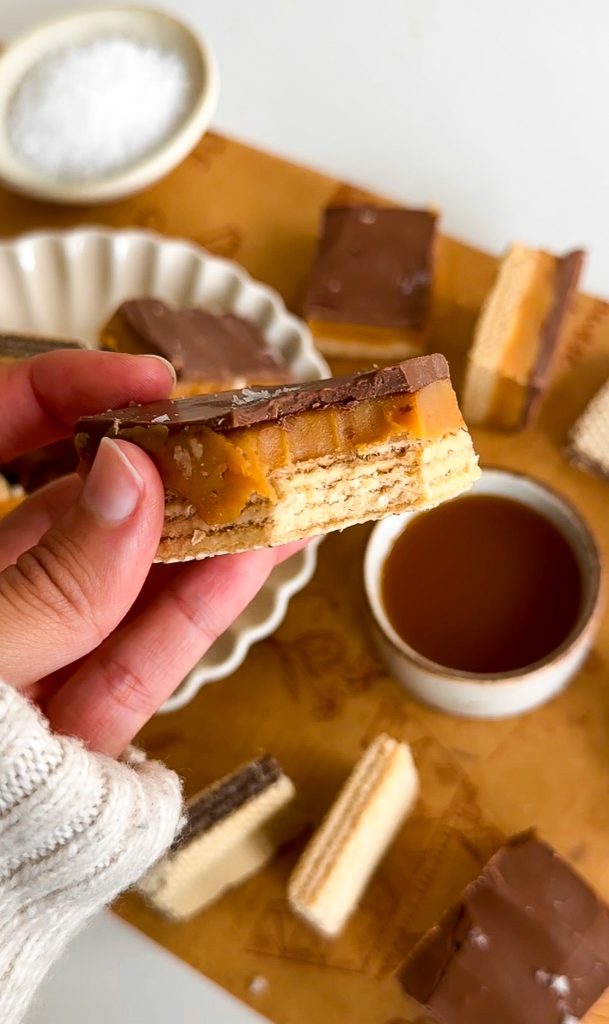
If you enjoy rich, indulgent desserts with the most addicting crunch, this Millionaire’s Mini Bars recipe will become your new favorite little sweet treat! Imagine layers of ooey gooey caramel, a hint of vanilla, and smooth chocolate all sitting on a base of crispy mini Loacker wafers. It’s a twist on the classic Millionaire’s Bar but even better might I dare to say. Trust me, this is one treat you’ll want to make over and over again and the whole process is pretty simple and effortless!
Preparing the Pan
To start, prepare your pan by lining it with parchment paper. I used a 9-inch by 9-inch pan and recommend you do the same unless you double the recipe. Then use a 16 by 9-inch pan! Make sure the paper hangs over the edges of the pan to make lifting the bars out easier later. Lightly grease the parchment with butter or non-stick spray to prevent sticking. This step ensures that your bars will come out of the pan cleanly, with no sticky surprises.
Making the Caramel Layer
For the caramel layer, combine sweetened condensed milk, unsalted butter, light brown sugar, corn syrup, vanilla extract, and a pinch of salt in a saucepan. Cook over medium heat, stirring constantly to keep the mixture from burning. As the caramel heats up, it will start to bubble—this is a good sign that it’s coming together. Keep stirring and reduce the heat to low once it starts to thicken and darken in color. You’re looking for a rich, golden color, which indicates the caramel is ready.
Tip: To prevent crystallization, make sure to stir continuously and use a clean, dry spoon.
Assembling the Dessert
Pour the freshly made caramel into the prepared pan, spreading it evenly with a spatula. While the caramel is still warm but not hot, arrange the mini Loacker wafers on top, pressing them gently into the caramel so they stick to it but don’t sink in. If they are sinking, then the caramel needs to cool down and firm up slightly. This layer will become your base once you flip it over, so make sure the wafers are evenly spaced and SLIGHTLY embedded in the caramel.
Tip: If you find the caramel is setting too quickly before you can arrange the wafers, pop the pan in the oven set to a low temperature (around 200°F) for a few minutes to soften it again. I highly recommend having all your wafers unwrapped and ready to go before the caramel layer is poured into the pan.
Transfer the tray to the fridge for about 15 to 30 minutes until the caramel firms up. Once the wafers and caramel are set, carefully flip the pan onto a flat surface. This way, the wafers will be on the bottom, providing a crispy base for your dessert. Transfer back into the same tray so now the caramel is on top.
Adding the Chocolate Layer
Next up is the chocolate layer. Melt your choice of milk or semi-sweet chocolate in a microwave-safe bowl or over a double boiler. Stir until the chocolate is completely smooth. Pour the melted chocolate over the caramel layer, spreading it evenly to cover the entire surface. Optional, add a sprinkle of flakey sea salt on top.
Tip: For a smooth finish, pour the chocolate slowly and use a spatula to spread it out gently. To avoid air bubbles, tap the pan lightly on the counter to level the chocolate layer.
Setting and Serving
Place the tray in the refrigerator and allow the chocolate to set completely. This usually takes about 30 minutes but could vary depending on the thickness of the chocolate layer. Once fully set, use the parchment paper overhang to lift the entire block out of the pan.
Cut the slab into individual pieces, using the wafers on the bottom as guidance for cutting the rows and columns. I recommend taking a peak under to see where the wafers start and finish and then make little indents on the side so you know where to cut perfectly.
Tip: For neat slices, use a sharp knife and clean the blade between cuts. If the chocolate is too hard to cut easily, let the bars sit at room temperature for a few minutes before slicing.

Variations and Tips
- Flavor Twist: Add a pinch of sea salt on top of the chocolate layer before it sets for a salted caramel twist.
- Nutty Addition: Fold chopped nuts like walnuts, pecans, or peanuts into the caramel before adding the wafers for an extra crunch.
- Spice It Up: A dash of cinnamon or a splash of espresso powder in the caramel can add a unique flavor profile.
Storing Leftovers and Shelf Life
Storing Leftovers: To keep your Millionaire’s Shortbread fresh and delicious, store the leftovers in an airtight container. You can place parchment paper or wax paper between layers to prevent them from sticking together.
Shelf Life:
- At Room Temperature: If kept in an airtight container, the shortbread can last for up to one week at room temperature. Store it in a cool, dry place away from direct sunlight.
- In the Refrigerator: For a longer shelf life, store the bars in the refrigerator, where they can stay fresh for up to two weeks. The cool environment will help preserve the caramel and chocolate layers.
- In the Freezer: To keep the shortbread for an extended period, you can freeze it. Wrap individual pieces in plastic wrap or foil, and then place them in a freezer-safe bag or container. Frozen Millionaire’s Shortbread can last for up to three months. When ready to enjoy, thaw at room temperature for about 20-30 minutes.
By following these storage tips, you can enjoy your Millionaire’s Shortbread at its best for as long as possible!
Craving More Sweets? Try These Recipes Out!
- Strawberry Cheesecake Bars
- Snickers Date Bark
- Smores Brownie Bites
- Kudos Bars
- Churro Cheesecake Bars
If you tried this recipe and loved it, drop by down below and let me know how you liked it with a rating and comment! Feel free to also leave a question there about this recipe and I’ll get right back to it.
To see more recipes and behind the scenes, follow along on Instagram and Youtube! I’m also now on Pinterest pinning away so stop by and see what’s up.

Millionaire’s Shortbread
Ingredients
- 1 can sweetened condensed milk
- ½ cup unsalted butter
- ⅔ cup light brown sugar
- ¼ cup corn syrup
- ½ tablespoon vanilla extract
- ¼ teaspoon salt
- mini Loacker wafers, about 20 or enough to cover the pan
- 1 cup milk or semi-sweet chocolate, melted
Instructions
PREPARE THE PAN
- Line an 8×8-inch square pan with parchment paper, ensuring the paper hangs over the edges for easy removal later.
- Lightly grease the parchment paper with butter or non-stick spray to prevent sticking.
CARAMEL LAYER
- In a saucepan, combine sweetened condensed milk, unsalted butter, light brown sugar, corn syrup, vanilla extract, and a pinch of salt.
- Cook the mixture over medium heat, stirring constantly until it starts to bubble.
- Lower the heat and continue cooking until the caramel thickens and takes on a deep golden color.
- Pour the caramel into the prepared pan, spreading it out evenly with a spatula.
THE WAFERS
- While the caramel is still warm, arrange the mini Loacker wafers on top, pressing them gently into the caramel.
- Once the caramel has cooled slightly and the wafers are set, flip the tray over onto a flat surface so the wafers become the base.
CHOCOLATE LAYER
- Melt your choice of chocolate in a microwave-safe bowl or over a double boiler, stirring until smooth.
- Pour the melted chocolate over the caramel layer, spreading it evenly to cover the entire surface.
- Place the tray in the refrigerator to allow the chocolate to set.
SLICE & SERVE
- Once the chocolate has fully set, use the parchment paper overhang to lift the entire block out of the pan.
- Slice into squares or bars with a sharp knife, wiping the blade clean between cuts for neat edges.
- Enjoy the delicious combination of creamy caramel, crunchy wafers, and smooth chocolate in every bite!
Did You Make This Recipe?
If you make this recipe, leave a comment below and let me know how it turns out. I love hearing from you!
Rate & Review