Making your own vanilla bean extract without alcohol is surprisingly easy! With food-grade glycerin or a simple syrup, you can create a rich, flavorful extract perfect for all your baking needs. Let’s get started with these two simple methods for homemade vanilla extract that’ll save you so much money at the grocery store!
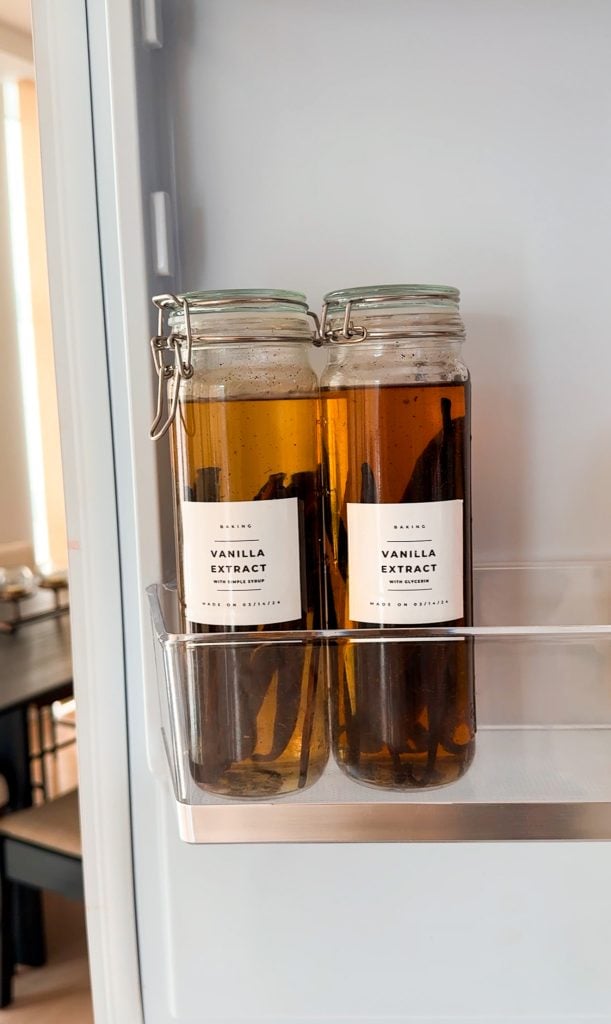
Making your own vanilla bean extract at home without alcohol is a fantastic way to ensure you have a pure, flavorful ingredient for all your baking needs. It’s surprisingly easy to do, and the results are rich and delicious. Whether you opt for food-grade glycerin or a simple syrup, you’ll end up with a wonderful extract that rivals any store-bought version.
Choosing Your Vanilla Beans and Glycerin
The quality of your vanilla extract begins with the vanilla beans. Look for Grade B beans, which are typically used for extract making because they are slightly drier and more concentrated in flavor. You can find these beans online from specialty spice shops or even at larger retailers like Costco and it’s super affordable. If you’re lucky enough to have a local spice shop, they often carry high-quality vanilla beans as well.
For the glycerin method, make sure you’re using food-grade glycerin. This is important because not all glycerin sold is suitable for consumption. You can find food-grade glycerin at health food stores or purchase it online.
The Difference Between Glycerin and Simple Syrup Methods
The two methods for making vanilla bean extract—using food grade glycerin or a simple syrup—yield slightly different results in terms of flavor and texture. Glycerin creates a thicker, slightly sweeter extract that is great for recipes where you want a bit of added richness. It also has the benefit of being a more stable preservative, meaning your extract will last longer.
Simple syrup, on the other hand, results in a lighter, more liquid extract. This method is fantastic if you’re looking for a purer vanilla flavor without the added sweetness that glycerin brings. It’s also easier to incorporate into recipes that call for liquid extracts, as it’s closer in consistency to traditional vanilla extract.
Making the Vanilla Bean Extract
To start, you’ll need to prepare your vanilla beans by splitting them lengthwise with a sharp knife. This exposes the seeds inside, which is where most of the flavor is concentrated. You can also cut the beans into smaller pieces to help them fit into your jar more easily and to ensure maximum flavor extraction.

For the glycerin method, mix food grade glycerin with a small amount of water to create a slightly diluted solution. This helps the glycerin infuse better with the vanilla beans. Place the split beans into a clean glass jar, then pour the glycerin mixture over them, making sure the beans are fully submerged. Seal the jar tightly and give it a gentle shake.
For the simple syrup method, combine water and sugar in a saucepan and heat until the sugar is completely dissolved. Let the syrup cool to room temperature before adding it to your jar of prepared vanilla beans. Again, make sure the beans are fully submerged before sealing the jar and giving it a gentle shake.
Infusion and Best Practices
Store your jar of vanilla beans in a cool, dark place. A pantry or cupboard works well. You can also store it in the fridge which is where I like to keep it just to be extra safe. Shake the jar gently once a week to help with the infusion process. Patience is key here—let the beans infuse for at least 6 months but a year is ideal for a more intense rich flavor.
Once the infusion period is complete, strain the extract through a fine mesh sieve or cheesecloth to remove the vanilla bean pieces and seeds. I personally like to keep the seeds in which means you can just pull out the pods. Transfer the finished extract to a clean bottle or jar for storage. Your homemade vanilla extract will keep well for several years if stored properly.
Tips and Tricks
- Quality Matters: Invest in good quality vanilla beans for the best flavor. Grade B beans are perfect for extract.
- Proper Storage: Keep your extract in a dark glass bottle to protect it from light, which can degrade the flavor over time.
- Longer Infusion: The longer you let your extract sit, the more flavorful it will become. If you can wait 6 months to 1 year, you’ll be rewarded with a truly rich and complex vanilla extract.
- Reuse Beans: After straining, don’t throw away the vanilla beans! You can dry them out and add them to a sugar jar to make vanilla sugar, or use them in other recipes.
Homemade vanilla extract is a wonderful project that yields delicious results and gives you a sense of satisfaction knowing you’ve made something from scratch. Whether you choose the glycerin or simple syrup method, you’ll end up with a versatile ingredient that will elevate your baking and cooking to new heights. Enjoy the process and the incredible flavor of your homemade vanilla bean extract!

Looking For Recipes to Use Vanilla Extract In? Try These Out!
- Chocolate Almond Croissants
- Banana Pudding
- Pumpkin Cream Cheese Muffins
- Creme Brulee Cheesecake Bars
- Birthday Cake Rice Krispies Treats
If you tried this recipe and loved it, drop by down below and let me know how you liked it with a rating and comment! Feel free to also leave a question there about this recipe and I’ll get right back to it.
To see more recipes and behind the scenes, follow along on Instagram and Youtube! I’m also now on Pinterest pinning away so stop by and see what’s up.

Vanilla Extract – Alcohol Free
Ingredients
METHOD 1: Using Glycerin
- 10 to 12 vanilla beans
- 1 1/2 cup food-grade glycerin
- 3/4 cup water
METHOD 2: Using Simple Syrup
- 10 to 12 vanilla beans
- 2 cups water
- 1 1/2 cup granulated sugar
Instructions
METHOD 1:
- Split the vanilla beans lengthwise with a sharp knife to expose the seeds inside. You can also cut the beans into smaller pieces to fit them better into the jar.
- Mix the food grade glycerin and water in a measuring cup or bowl.
- Place the prepared vanilla beans into a clean glass jar. Pour the glycerin and water mixture over the beans, ensuring they are fully submerged. If needed, add more glycerin to cover the beans completely.
- Seal the jar tightly with a lid. Shake the jar gently to mix the contents.
- Store the jar in a cool, dark place or in the fridge. Shake the jar gently once a week to help the infusion process. Allow the vanilla beans to infuse for at least 6 months, though longer will yield a more intense flavor.
- After the desired infusion period, strain the vanilla extract through a fine mesh sieve or cheesecloth to remove the beans and seeds. Transfer the extract to a clean bottle or jar for storage.
METHOD 2:
- Split the vanilla beans lengthwise with a sharp knife to expose the seeds inside. You can also cut the beans into smaller pieces to fit them better into the jar.
- In a small saucepan, combine the water and sugar. Heat over medium heat, stirring until the sugar is completely dissolved. Remove from heat and let the syrup cool to room temperature.
- Place the prepared vanilla beans into a clean glass jar. Pour the cooled simple syrup over the beans, ensuring they are fully submerged. If needed, add more simple syrup to cover the beans completely.
- Seal the jar tightly with a lid. Shake the jar gently to mix the contents.
- Store the jar in a cool, dark place. Shake the jar gently once a week to help the infusion process. Allow the vanilla beans to infuse for at least 6 months, though longer will yield a more intense flavor.
- After the desired infusion period, strain the vanilla extract through a fine mesh sieve or cheesecloth to remove the beans and seeds. Transfer the extract to a clean bottle or jar for storage.
Did You Make This Recipe?
If you make this recipe, leave a comment below and let me know how it turns out. I love hearing from you!

Rate & Review